By The Green Parent
03rd April 2021
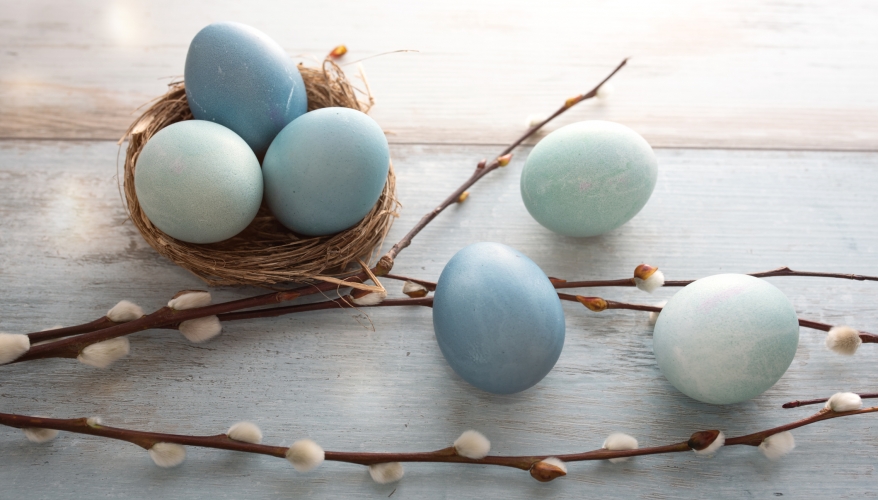
Dye your own Easter eggs - Natural dyes make a display of pretty pastel eggs
GATHER TOGETHER
As many eggs as you’d like to dye; Several tubs or bowls (one for each dye); The ingredients for your colours of choice (see below)
LET’S GO!
1. Choose your colours.
BLUE - Put 1/4 red cabbage cut into chunks into a pan filled with four cups of boiling water. Add two tablespoons of white vinegar and turn off the heat. Cool to room temperature and remove the cabbage from the pan. Soak the eggs
in the water overnight.
GREY-BLUE - Add a cup of frozen blueberries to a cup of warm water. When the mixture comes to room temperature, remove the blueberries (when they’re drained, they’re perfect for pancakes or snacks!) and soak your eggs in the coloured water overnight.
LAVENDER - Mix a cup of grape juice with a tablespoon of white vinegar and soak your eggs overnight.
PALE PINK - Take one cup of juice from tinned beetroot and add one tablespoon of white vinegar. Soak eggs overnight (or less time for a gentler hue).
GOLDEN BROWN - Simmer two tablespoons of dill seeds in a cup of water for 15 minutes. Strain the liquid through a sieve into a small bowl, and add two teaspoons of white vinegar. Add your eggs to the liquid and leave overnight.
MUSTARD YELLOW - Add two tablespoons of turmeric powder and two teaspoons of white vinegar to a cup of boiling water and stir. Add your eggs.
GREEN - Put the skins of six red onions into a pan with two cups of water and simmer on the stove for 15 minutes. Remove the skins and add three teaspoons of white vinegar to the pan. Soak your eggs overnight in the liquid.
2. Store your eggs. Once they’ve reached your desired colour (leaving them for longer will result in a deeper dye, while less time will mean they’re paler), take them out of the dye, pat them dry gently with a paper towel, and store in the fridge until you want to put them on display.
3. Eat them! Don’t forget to use your eggs after you’ve displayed them – unless they’re cracked, they shouldn’t have absorbed any of the flavours of the dyes, so you can still use the raw eggs in any recipe you like – scrambled or poached, custard or cake, the options are almost endless!
Get to know a tree - Habitat, weather vane, lookout – your favourite tree is much busier than you think…
GATHER TOGETHER
Magnifying glass; Pencil; Notebook; Leaf chart
LET’S GO!
Did you know?
Trees’ branches aren’t just lofty perches. They’re incredibly intricate plumbing systems that ferry water, sugar and hormones from the roots to the twigs, regulating their growth and signalling when to produce fruit, flowers or leaves. Ancient trees can also tell you about what your local area’s climate was like in the past – the concentric rings within the trunk are wider in warm, wet years and thinner in cold or dry years, so scientists can use them to find out whether there were droughts, floods or other wild weather in the days long before humans kept a record.
- Find a great tree. Take a good look around your garden, neighbourhood or local park to find a tree that looks good for climbing (one with some low branches or good footholds, and some nice boughs for perching in).
- Stand back from your tree. Is there one side that’s bushier or bigger than the other? The bigger side is probably facing south if you’re in the northern hemisphere (north if you’re
- in the southern hemisphere). That’s because the tree grows more strongly towards the sun.
- Standing near the trunk, look upwards. Can you see any patterns in the way the branches spread out from the trunk?
- Carefully climb your tree and find a safe place to rest. If possible, you might like to sit astride a wide branch, and lean back against the trunk.
- Do you have company? It’s not only birds that like to live in trees – can you spot a squirrel’s nest, or ‘drey’? What about a snail, centipede or caterpillar? Can you identify a stag beetle, or a grasshopper, or a shield bug? If you look closely, you should find that your tree is teeming with busy life. Note down and sketch your discoveries.
- Using your magnifying glass, look at the leaves to work out what kind of tree you’ve chosen. Perhaps you’d like to start a leaf collection in the pages of your notebook.
- Did you know trees can predict the weather? If some of the leaves have turned upside down, there might be a storm on the way. (Leaves with soft stems will often become limp and flip over in the humidity change that precedes a storm.) If a pine cone is open, the weather is likely to stay dry, while a closed pine cone means rain is on its way.
- Map the location of your tree in your notebook so that you can visit it again. Which creatures can you find in the different seasons?
Make seed bombs - Bring blooms to life in the most unlikely corners of your neighbourhood
GATHER TOGETHER
Flower seeds (more varieties means more forage for bees. Choose seeds that are suitable for your local climate); Peat-free compost or potting mix; Clay; Cup of water; Large bowl; Baking tray
LET’S GO!
- Cover a table with a cloth or newspaper and collect all of your materials together.
- In your bowl, combine about five handfuls of compost with a handful of seeds and mix together.
- With wet hands, break off about five handfuls of clay, and then tear into smaller, walnut-sized pieces. Place on the baking tray for now.
- Dribble a small amount of water into your compost mix, until it’s just damp (not soaked). Use your hands to roughly mix, then add your pieces of clay and knead, squeeze and squish quickly until it’s well combined.
- Take a handful of the mix and form ping-pong-ball-sized pieces.
- Place on the baking tray, and leave somewhere warm to dry for at least 3 hours.
- Take them to the streets! The perfect time to scatter your seed bombs is right before it rains, so that the seeds get plenty of water to help them get started. Think about where they can go: neglected garden beds at your home or school, vacant lots or the bases of neighbourhood trees are all good places to start.
Did you know?
Seed bombs are often used by ‘guerrilla gardeners’ to beautify unloved patches of public land. The movement – and seed bombs themselves – began in New York in the 1970s, when the city was in the grip of a financial crisis and public spaces, especially parks, were woefully neglected. Founded by Liz Christy, the Green Guerrillas decided to take matters into their own hands, using their own time and resources to turn abandoned building sites into flourishing meadows of wildflowers and greenery. They’d lob the seed bombs they made over fences into disused lots to give locals something beautiful to look at instead of rubble, an act of urban activism that you’re continuing today.
Delfina is passionate about encouraging kids away from screens, getting them to slow their pace enough to really observe, to examine, contemplate and wonder.
Illustrations by Sabrina Arnault with Hiromi Suzuki
MORE INSPIRATION
READ The Nature of Play by Delfina Aguilar
CREATE Find workshops run by Delfina at fannyandalexander.co.uk